Getting started with Bryntum Grid in Remix
This quick start guide will show you how to build a basic Bryntum Grid in a Remix TypeScript application.
Version requirements
Bryntum Grid requires React 16.0.0 or higher and TypeScript 3.6.0 or higher for applications written in
TypeScript and Remix version 2.15.0 requires Node LTS version.
Version requirements
Minimum supported:
- React:
16.0.0or higher - TypeScript:
3.6.0or higher (for TypeScript application) - Vite
4.0.0or higher (for application build with Vite)
Recommended:
- React:
18.0.0or higher - TypeScript:
4.0.0or higher (for TypeScript application) - Vite
5.0.0or higher (for application build with Vite)
Getting started
To get started, we will follow these steps to create a basic Bryntum Grid Remix app:
- Setup a Remix application
- Install the Bryntum Grid component
- Create a Bryntum Grid component
- Run the application
The basic Bryntum Grid starter template that we'll build will look like this:
Setup a Remix application
We'll use the Remix quick start guide to create a Remix application. Create a Remix application by running the following command:
npx create-remix@latest
This command will prompt a few questions:
- Where should we create your new project?
 my-remix-grid
- Initialize a new git repository?
 Yes
- Install dependencies with npm?
 Yes
After you've selected your answers for the prompt questions, create-remix will create a folder with your
project name and install the dependencies.
Change your current working directory to the new Remix project directory:
cd my-remix-grid
Install the Bryntum Grid component
Installing the Bryntum Grid component using npm is the quickest way to use our products. First, get access to the Bryntum private npm registry by following the guide in our docs.
From your terminal, update project dependencies using the following commands:
npm install @bryntum/grid@npm:@bryntum/[email protected] @bryntum/[email protected]
Ensure that you have configured your npm properly to get access to the Bryntum packages. If not, refer to this guide.
You'll also need to install remix-utils to do client-side rendering.
npm install remix-utils
Dependencies
The application configuration may add a caret ^ as a prefix of the dependencies version in your package.json file.
We recommend removing the caret character as a version prefix so that you have full control over package updates.
Create a Bryntum Grid component
Let's start by creating a config file called app.config.tsx.
Create a components folder in the app folder and add the following lines of code to it:
import { BryntumGridProps } from '@bryntum/grid-react';
export const gridProps: BryntumGridProps = {
columns : [
{
text : 'Name',
field : 'name',
flex : 1,
editor : {
type : 'textfield',
required : true
}
}, {
text : 'Age',
field : 'age',
width : 100,
type : 'number'
}, {
text : 'City',
field : 'city',
flex : 1
}, {
text : 'Food',
field : 'food',
flex : 1
}, {
text : 'Color',
field : 'color',
width : 80,
type : 'column',
renderer : ({ cellElement, value }) => {
cellElement.style.color = value;
cellElement.style.fontWeight = '700';
return value;
}
}
],
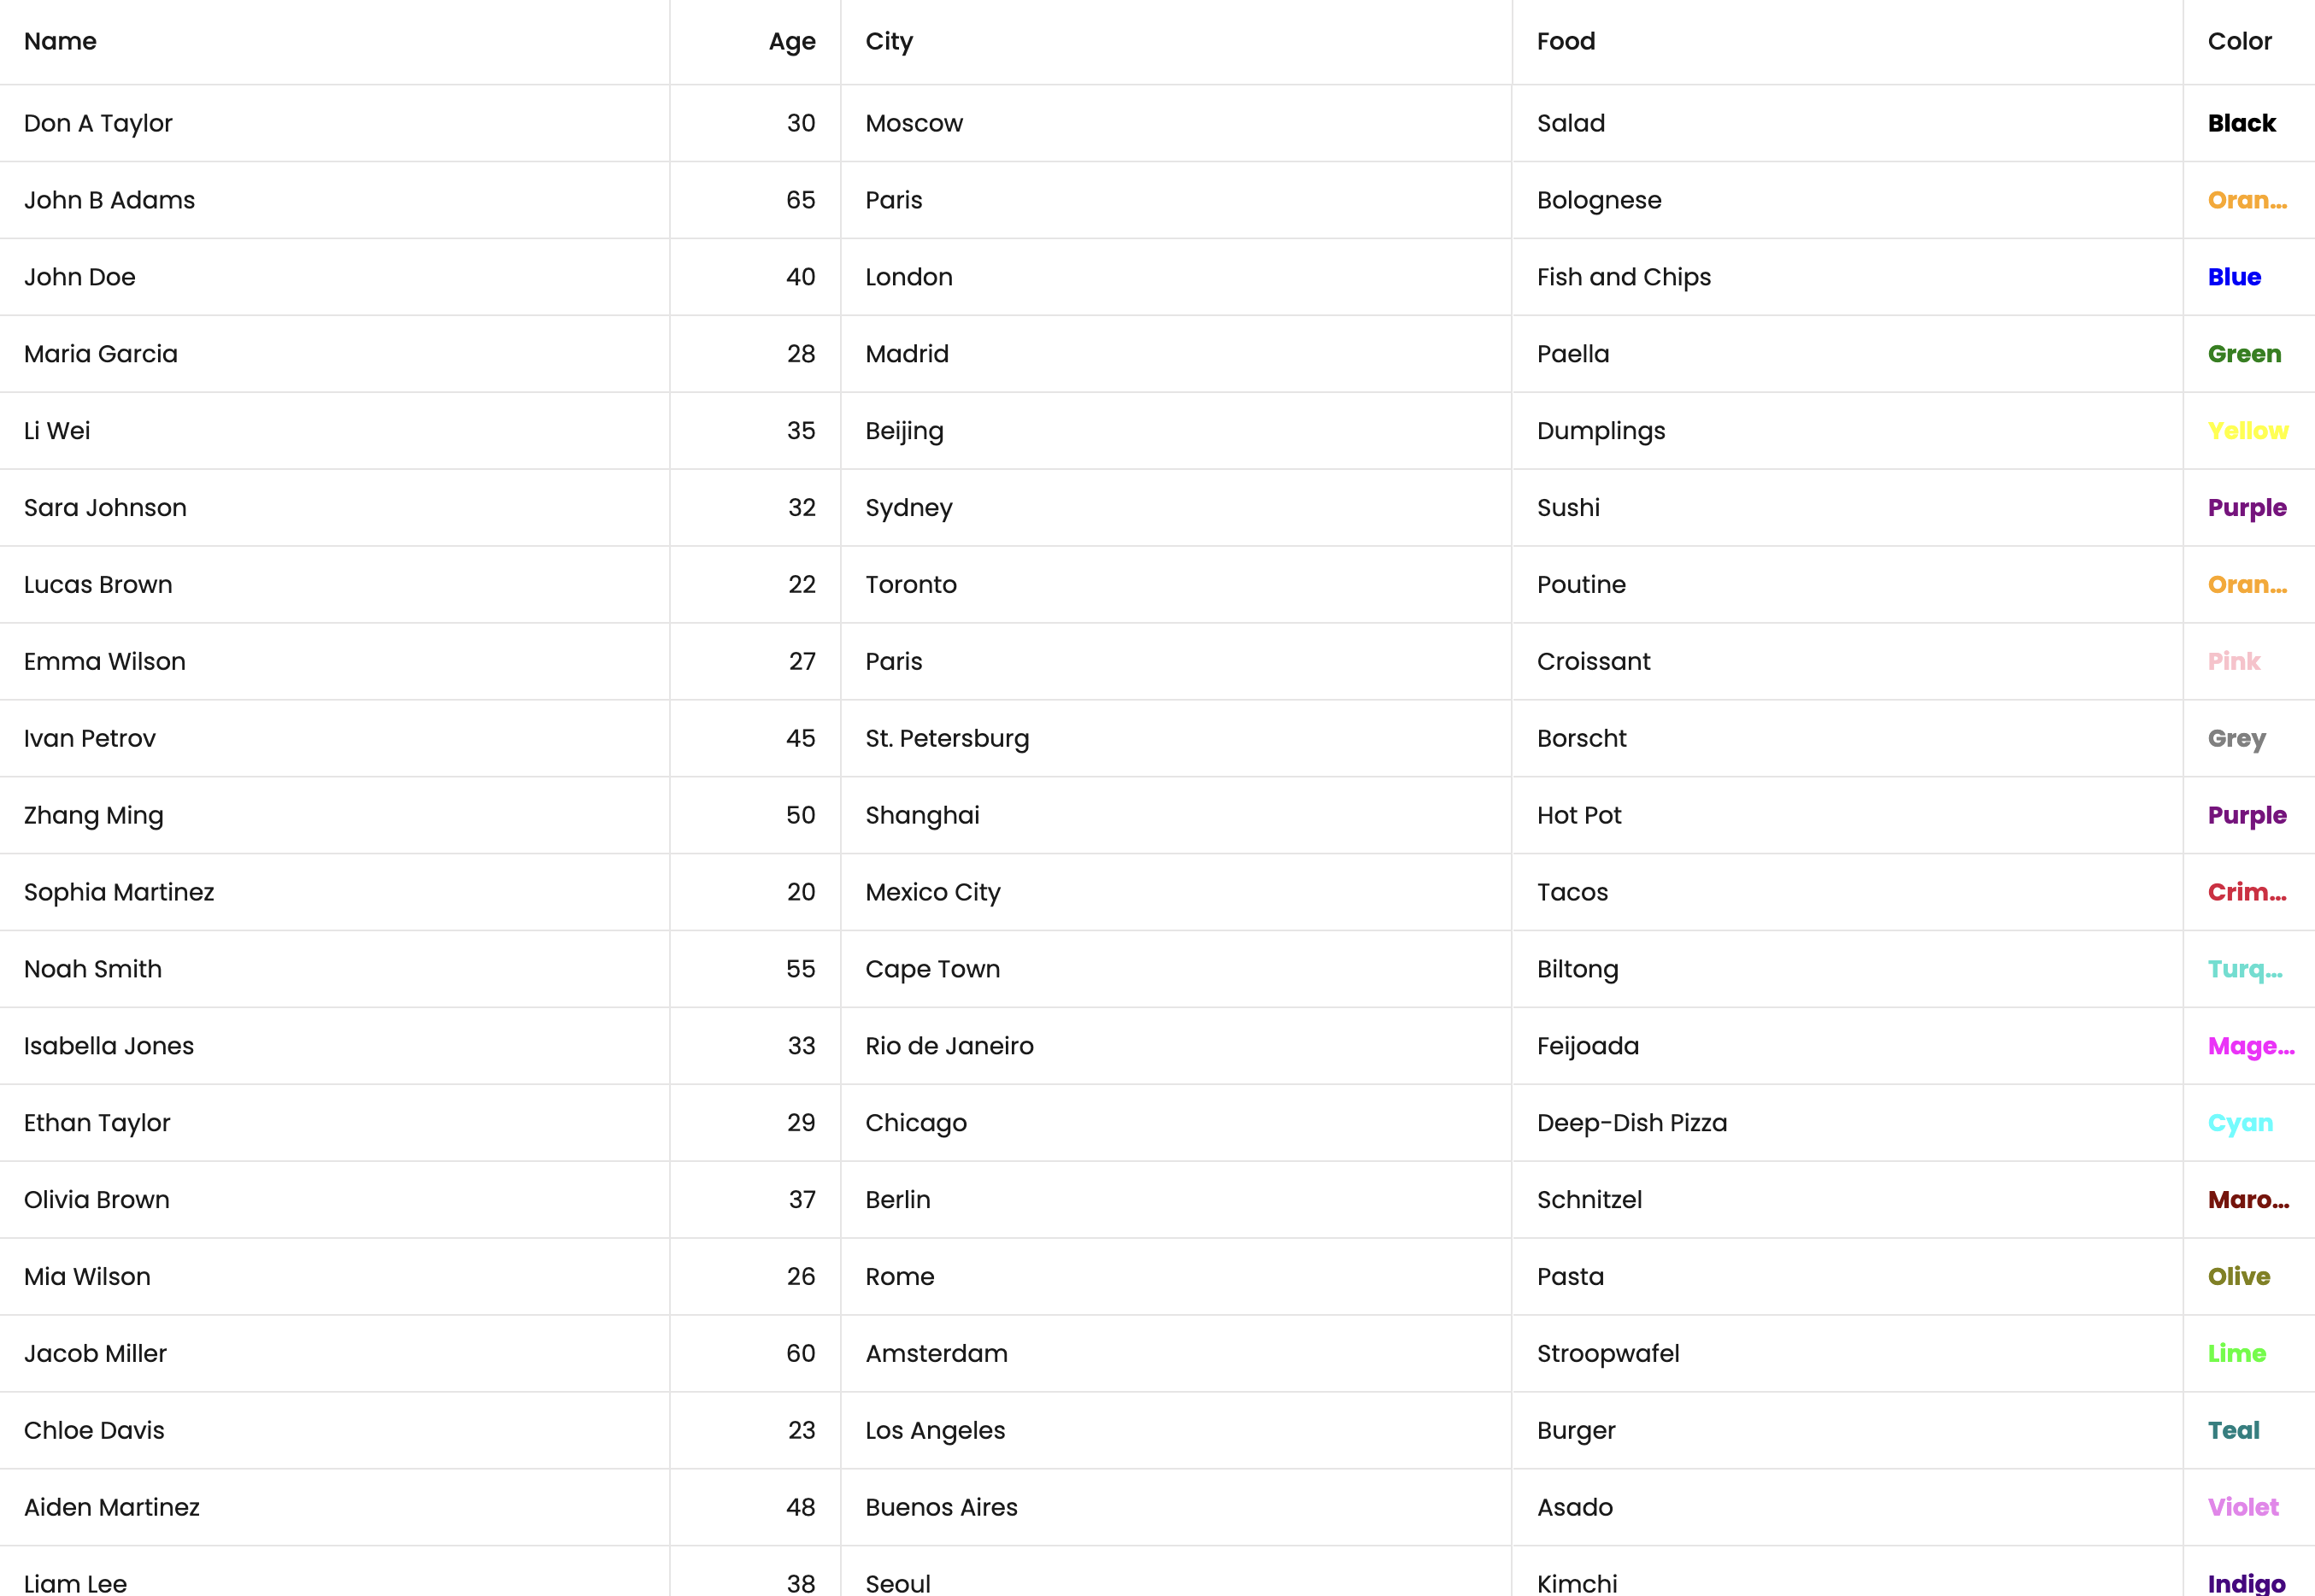
data : [
{ id : 1, name : 'Don A Taylor', age : 30, city : 'Moscow', food : 'Salad', color : 'Black' },
{ id : 2, name : 'John B Adams', age : 65, city : 'Paris', food : 'Bolognese', color : 'Orange' },
{ id : 3, name : 'John Doe', age : 40, city : 'London', food : 'Fish and Chips', color : 'Blue' },
{ id : 4, name : 'Maria Garcia', age : 28, city : 'Madrid', food : 'Paella', color : 'Green' },
{ id : 5, name : 'Li Wei', age : 35, city : 'Beijing', food : 'Dumplings', color : 'Yellow' },
{ id : 6, name : 'Sara Johnson', age : 32, city : 'Sydney', food : 'Sushi', color : 'Purple' },
{ id : 7, name : 'Lucas Brown', age : 22, city : 'Toronto', food : 'Poutine', color : 'Orange' },
{ id : 8, name : 'Emma Wilson', age : 27, city : 'Paris', food : 'Croissant', color : 'Pink' },
{ id : 9, name : 'Ivan Petrov', age : 45, city : 'St. Petersburg', food : 'Borscht', color : 'Grey' },
{ id : 10, name : 'Zhang Ming', age : 50, city : 'Shanghai', food : 'Hot Pot', color : 'Purple' },
{ id : 11, name : 'Sophia Martinez', age : 20, city : 'Mexico City', food : 'Tacos', color : 'Crimson' },
{ id : 12, name : 'Noah Smith', age : 55, city : 'Cape Town', food : 'Biltong', color : 'Turquoise' },
{ id : 13, name : 'Isabella Jones', age : 33, city : 'Rio de Janeiro', food : 'Feijoada', color : 'Magenta' },
{ id : 14, name : 'Ethan Taylor', age : 29, city : 'Chicago', food : 'Deep-Dish Pizza', color : 'Cyan' },
{ id : 15, name : 'Olivia Brown', age : 37, city : 'Berlin', food : 'Schnitzel', color : 'Maroon' },
{ id : 16, name : 'Mia Wilson', age : 26, city : 'Rome', food : 'Pasta', color : 'Olive' },
{ id : 17, name : 'Jacob Miller', age : 60, city : 'Amsterdam', food : 'Stroopwafel', color : 'Lime' },
{ id : 18, name : 'Chloe Davis', age : 23, city : 'Los Angeles', food : 'Burger', color : 'Teal' },
{ id : 19, name : 'Aiden Martinez', age : 48, city : 'Buenos Aires', food : 'Asado', color : 'Violet' },
{ id : 20, name : 'Liam Lee', age : 38, city : 'Seoul', food : 'Kimchi', color : 'Indigo' },
{ id : 21, name : 'Sophie Kim', age : 21, city : 'Tokyo', food : 'Ramen', color : 'Pink' },
{ id : 22, name : 'Alexander Nguyen', age : 41, city : 'Hanoi', food : 'Pho', color : 'Coral' },
{ id : 23, name : 'Ella Patel', age : 19, city : 'Mumbai', food : 'Curry', color : 'Amber' },
{ id : 24, name : 'James O Connor', age : 34, city : 'Dublin', food : 'Irish Stew', color : 'Green' },
{ id : 25, name : 'Isabelle Chen', age : 31, city : 'Hong Kong', food : 'Dim Sum', color : 'Brown' }
]
};
This object will be used for configuration of the Bryntum Grid component.
Next, we'll create a Bryntum Grid React component. Create a file called bryntum.client.tsx in the
app/components/ folder. Add the following lines of code to it:
import { BryntumGrid } from '@bryntum/grid-react';
import { gridProps } from './app.config';

const BryntumClient = () => {
    return (
        <BryntumGrid
            {...GridProps}
        />
    );
};

export default BryntumClient;
The file extension is .client.tsx becase Bryntum components are rendered on client-side only and Remix uses
.client.tsx for client side files.
We need to create a wrapper component for the Bryntum Grid React component to render on the client only.
Replace the app/routes/_index.tsx file with the following code:
import { ClientOnly } from 'remix-utils/client-only';
import BryntumClient from '~/components/bryntum.client';

export default function Index() {
    return (
        <ClientOnly fallback={<h1>Loading Bryntum Grid</h1>}>
            {() => <BryntumClient/>}
        </ClientOnly>
    );
}
Where the ClientOnly lets you render the components on the client-side only.
Styling
To style the Bryntum Grid, create a app/styles/ folder and add index.css file:
body,
html {
    margin         : 0;
    display        : flex;
    flex-direction : column;
    height         : 100vh;
    font-family    : Poppins, "Open Sans", Helvetica, Arial, sans-serif;
    font-size      : 14px;
}
Import the index.css file along with the structural CSS for Grid and the Bryntum theme of your choice in
Bryntum.client.tsx:
/* FontAwesome is used for icons */
import "@bryntum/grid/fontawesome/css/fontawesome.css";
import "@bryntum/grid/fontawesome/css/solid.css";
/* Import the structural CSS for grid */
import "@bryntum/grid/grid.css";
/* Import a Bryntum theme */
import "@bryntum/grid/svalbard-light.css";
import "../styles/index.css";
Visit Creating a custom theme section for more info on how to create a custom theme.
You can learn more about styling your Bryntum Grid in our style guide.
Run the application
Run the local development server:
npm run dev
You'll see the Bryntum Grid app at the URL http://localhost:5173/.
Troubleshooting
Please refer to this Troubleshooting guide.
What to do next?
Further on integration with React
Do you want to know more about how Bryntum Grid integrates with react and start to customize your application? We provide you with a complete React guide here.
Learn about Data
Bryntum components often use multiple collections and entities.
The Data guide explains how they all fit together.